
User Email Accounts
Return to: Configuration/Setup
Contents [hide]
User Email Accounts Overview
You must configure the User Email Accounts settings to:
- Enable ServicePRO’s Email Inbox feature.
- Allow Support Reps to send email from their local accounts while updating a request.
- Allow administrators to send the access code for their ServicePRO licenses.
Mail Server Settings
- From the Configuration tab, click on the "User Email Accounts" option.
- Click on the "Mail Server Settings" icon to open the Configure User Email Settings window, as shown below.
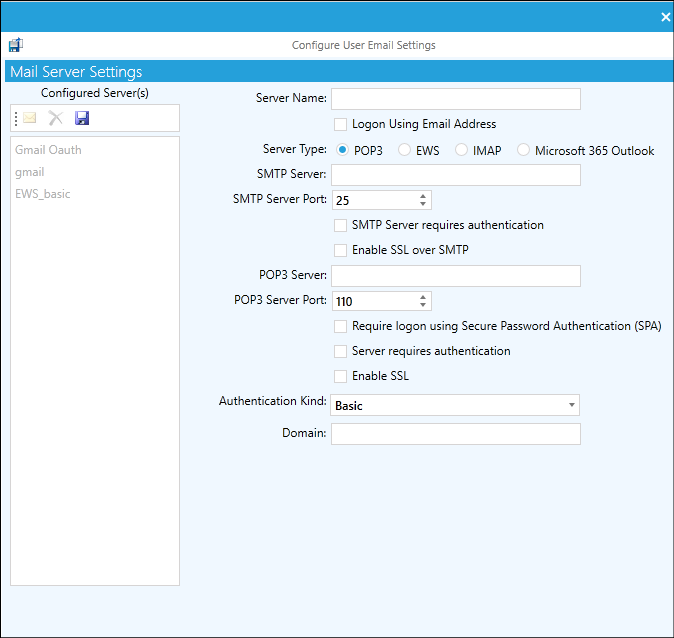 Mail Server Settings
 - ServicePRO allows you to configure multiple email servers. Click on the New icon found just above the Configure Server(s) list.
- Complete the Mail Server’s Settings form or each specific mail server.
- Give each server a unique Configuration Name.
- Click on the appropriate radio button to select whether the email system is POP3/SMTP, EWS (Exchange Web Services) or Internet Message Access Protocol (IMAP) server:
- POP3/SMTP - Specify the POP3/SMTP server names. If you are using the default settings for the server ports and domain, do not enter information into these fields. When ‘OAuth 2.0’ is selected for Authentication Kind, please make sure to click on the ellipsis button next to the field and enter the JSON private key that was downloaded for the Gmail Service account (Step 3.8 in Gmail OAuth 2.0 setup document) in the dialog that opens up. Once the user email server setting is configured using OAuth 2.0, ServicePRO accesses the user’s mailboxes using the OAuth 2.0 authentication method. Note:-By default, "Basic Authentication Kind is selected.
- EWS - Simply select EWS and enter the EWS URL. When "EWS" server type is selected, a new field "EWS Authentication Kind" shows up. This field has two options to choose from "Basic” and “OAUTH 2.0". By default, “Basic” EWS Authentication Kind is selected. When ‘OAuth 2.0’ is selected for EWS Authentication Kind, ServicePRO accesses the user’s mailboxes using the OAuth 2.0 authentication method, by utilizing the App ID, Tenant ID and Client Secret entered in the CONFIG files. In order to enable the OAuth 2.0 EWS Authentication kind, the pre-requisites detailed in the following section must be met - OAuth 2.0 EWS Authentication - Prerequisites
When ‘OAuth 2.0’ is selected for Authentication Kind, please make sure to click on the ellipsis button next to the field and enter the EWS Scope, EWS Application Id, EWS Tenant Id and EWS Client Secret key in the dialog that opens up.
When using EWS with OAUTH 2.0 for User Email Settings, users cannot change the mailbox in the email inbox.Note: The settings that are required for OAuth 2.0 Authentication in User Mail Server setup have been moved from the Configuration Files to the ServicePRO Application User Interface, from version 14.2.22.x on-wards. So, whenever the Client Secret Key expires, please take care of updating the same from the User Mail Server setting window.
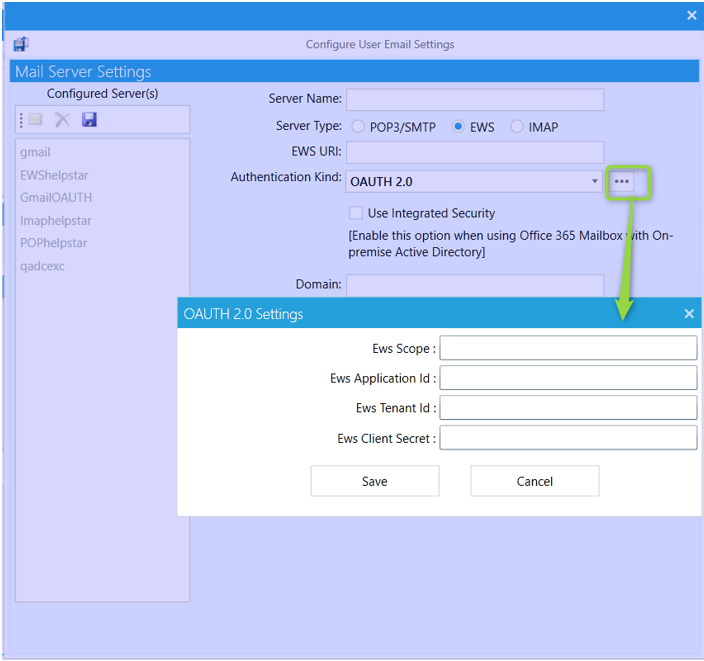 OAuth 2.0 Settings-User Email account
 - IMAP - Specify the SMTP server name and port, IMAP server name and port along with other requirements for accessing the server. When ‘OAuth 2.0’ is selected for Authentication Kind, please make sure to click on the ellipsis button next to the field and enter the JSON private key that was downloaded for the Gmail Service account (Step 3.8 in Gmail OAuth 2.0 setup document) in the dialog that opens up. Once the user email server setting is configured using OAuth 2.0, ServicePRO accesses the user’s mailboxes using the OAuth 2.0 authentication method. Note:- By default, “Basic” Authentication Kind is selected.
- Microsoft 365 Outlook - (This option is available from 14.2.22.64 & above) - You must select this option if you are using Office 365 / Exchange Online Mailboxes
When “Microsoft 365 Outlook” server type is chosen, the only option available for “Authentication Kind” is OAUTH 2.0. ServicePRO accesses the user’s mailboxes using the OAuth 2.0 authentication method, by utilizing the Application ID, Tenant ID and Client Secret (Only for Government Clients, GCC Client Endpoint URL as well) that is entered in the OAUTH 2.0 settings dialog that opens when ellipsis button beside “Authentication Kind” field is selected.In order to enable the OAuth 2.0 Authentication kind for Microsoft 365 Outlook, the pre-requisites detailed in the following section must be met Microsoft 365 Outlook Pre-requisite.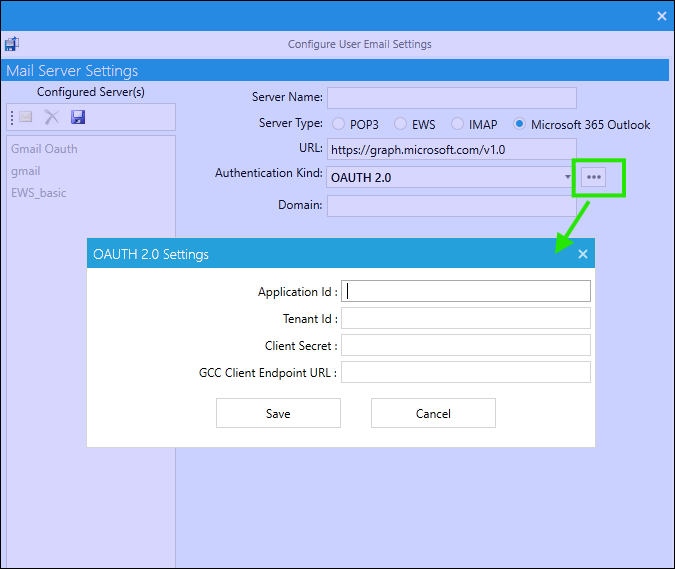 OAuth 2.0- Microsoft 365 Outlook
1. Update the URL in the URL field to https://graph.microsoft.com/v1.0
2. Please make sure to click on the ellipsis button next to the field and enter the Application ID, Tenant ID and Client Secret that were captured after completing the pre-requisites step (i.e. Register ServicePRO Application in Azure)
Application Id: From the registered application in Azure (pre-requisites section)
Tenant Id: From the registered application in Azure (pre-requisites section)
Client Secret: From the registered application in Azure (pre-requisites section)
GCC Client Endpoint URL: this is only for government azure client, check with the client if they are using GCC in Azure and ask to provide the URL, usually for US it is https://login.microsoftonline.us but it also requires to make changes in the URL in Microsoft 365 Outlook Settings in ServicePRO (instead of https://graph.microsoft.com/v1.0 , it should be https://graph.microsoft.us/v1.0 )
Note: When using Microsoft 365 Outlook server type for User Email Settings, users cannot change the mailbox in the email inbox (this behavior mirrors EWS OAUTH 2.0 with Integrated Security). - Click on the Save icon just above the Configure Server(s) list to save the changes for each specific email server you configure.
- Click on the Save icon in the Toolbar when you are done configuring all your email servers.
Configuring User Email Accounts
- From File > Setup/Administration, go to the Configuration tab and click on User Email Accounts. The Configure User Email Settings window appears as shown below.
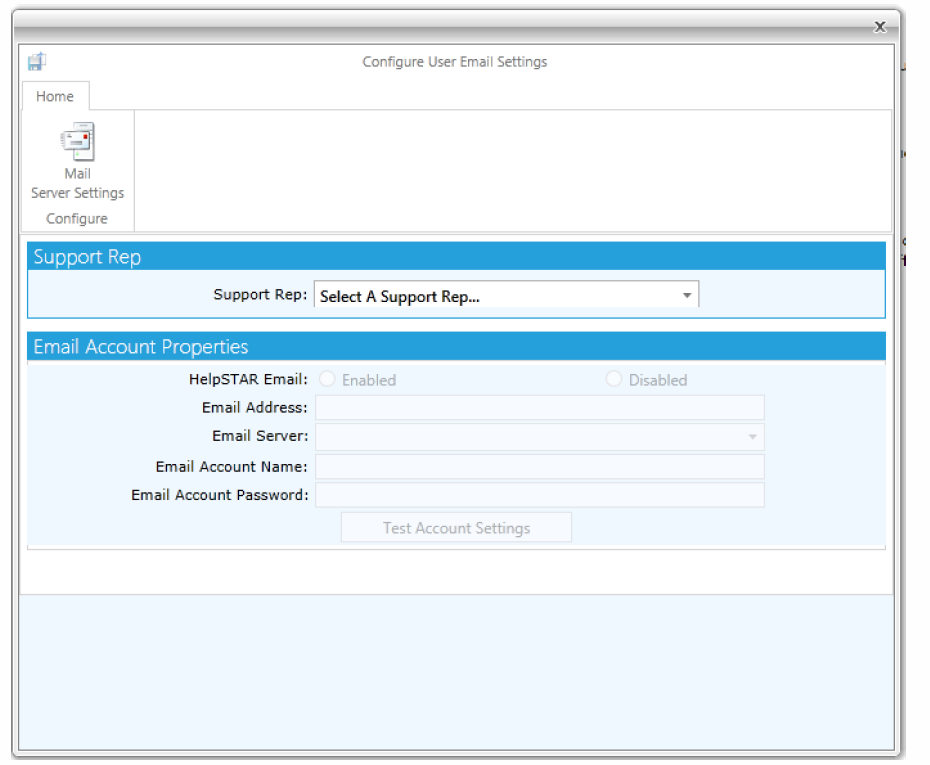 Support Rep Email Account Settings
 - Select the Support Rep whose email account you want to configure.
- Enter your Support Reps' local email account information in the Email Account Properties work area. The fields in this area might already be populated with this information:
- It can be entered when adding a user (from the Email work area of the User Information: Logins tab)
- It can be entered by the Support Reps themselves from their personal user options.
- Click on the Test Account Settings button to check the settings.