Manage Assets
Return to Manage Infrastructure
Assets consist of the hardware and software assets which belong to your organization. You require the Asset Administrator privilege to add or modify assets.
Navigation
- Navigate to the backstage menu by clicking on the ServicePRO icon.
- From the Management tab, click on the Manage Assets option as highlighted below.
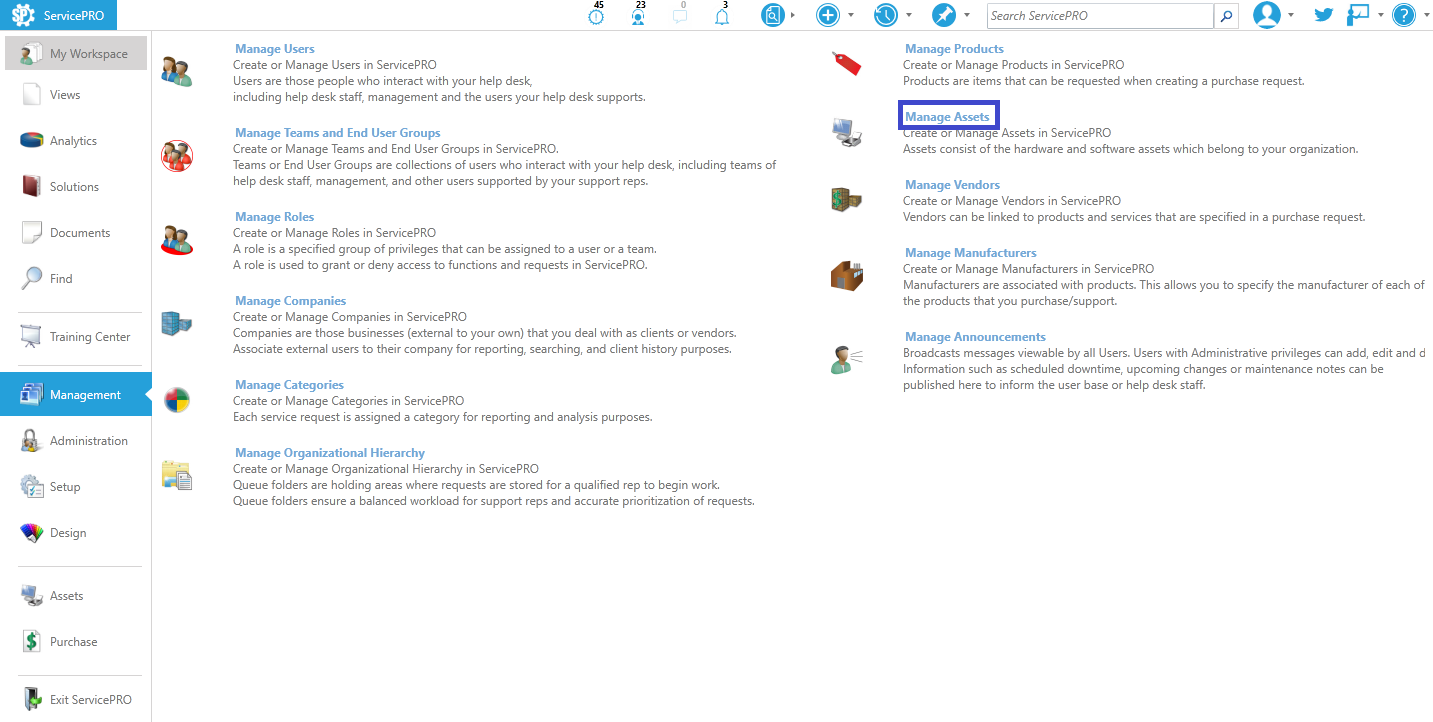 Manage Assets Navigation
Adding New Assets
New Assets such as hardware and software can be added into ServicePRO. There are 3 built-in types of Assets: Hardware, Software, and Workstation (additional types can be created in Form Designer).Click on the New Asset icon from the ribbon toolbar. The New Asset window will appear. It can contain two tabs, Main and Custom Fields (if you are using a custom Asset type).
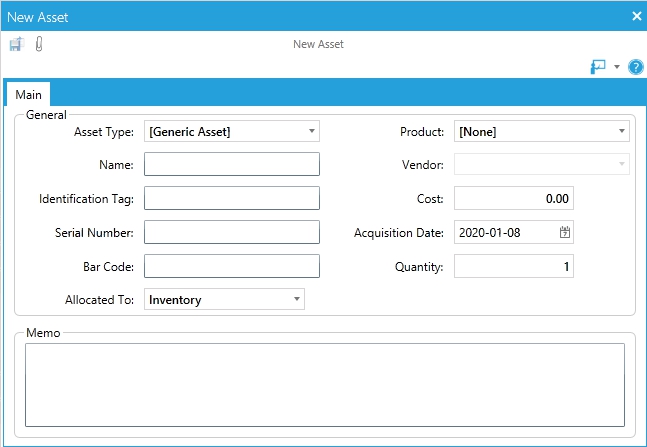
- In the Type field, select the type of asset you are adding. By default, it will be "[Generic Asset]", but three other options are provided (Hardware, Software, or Workstation). If custom assets types have been created via Custom Forms, those will be included in this drop-down list.
- In the Name field, enter a unique name for the asset.
- In the Identification Tag field, enter it's label or barcode number.
- In the Serial Number field, enter it's associated serial number.
- In the Bar Code field, enter the Bar Code number.
- In the Allocated To field, you can associate the asset to another items such as: Assets, Company, Organizational Unit, and User. The default value is "Inventory" which means it's unallocated.
- In the Product field, choose the associated Product if necessary. The default is [None] meaning there is no Product associated with this asset.
- In the Vendor field, choose the associated Vendor for the associated Product. The Vendor field will be greyed out if no Product or [None] has been chosen.
- In the Cost field, enter in the price of the asset.
- In the Acquisition Date field, enter in the date the asset was acquired
- In the Quantity field, put in the number of assets of this name that you own.
- In the Memo field, put it any additional notes about this asset that might be of importance.
Managing Existing Assets
Users with Asset Administrator privileges can add, update, or de-activate an asset as needed.
- In the Define Criteria work area, select criteria from the Search and Match drop-down lists and enter a value in the Value field to help you narrow the list presented in the table below this work area.
- Click on the Find button. The search results will be displayed in the table.
- Select the asset you need to update or modify by double-clicking on that asset’s name. The asset properties will be displayed in a new window. Asset properties will appear with a Manage Asset toolbar in the ribbon, as shown below.

In the Asset Properties window, you will see the data for the asset as well as the Allocation History which shows you the current location of an asset. If this asset had been previously allocated to another asset, company, organizational unit, or user, this history will also be listed here.
The following tasks can be accessed by clicking on the corresponding icons:
- Update – Update asset information
- Print – Print the asset properties
- Output to text file – Save asset properties to a text file to a specified location
- Asset History - Shows a list of service requests where that asset is associated to it based on a date range