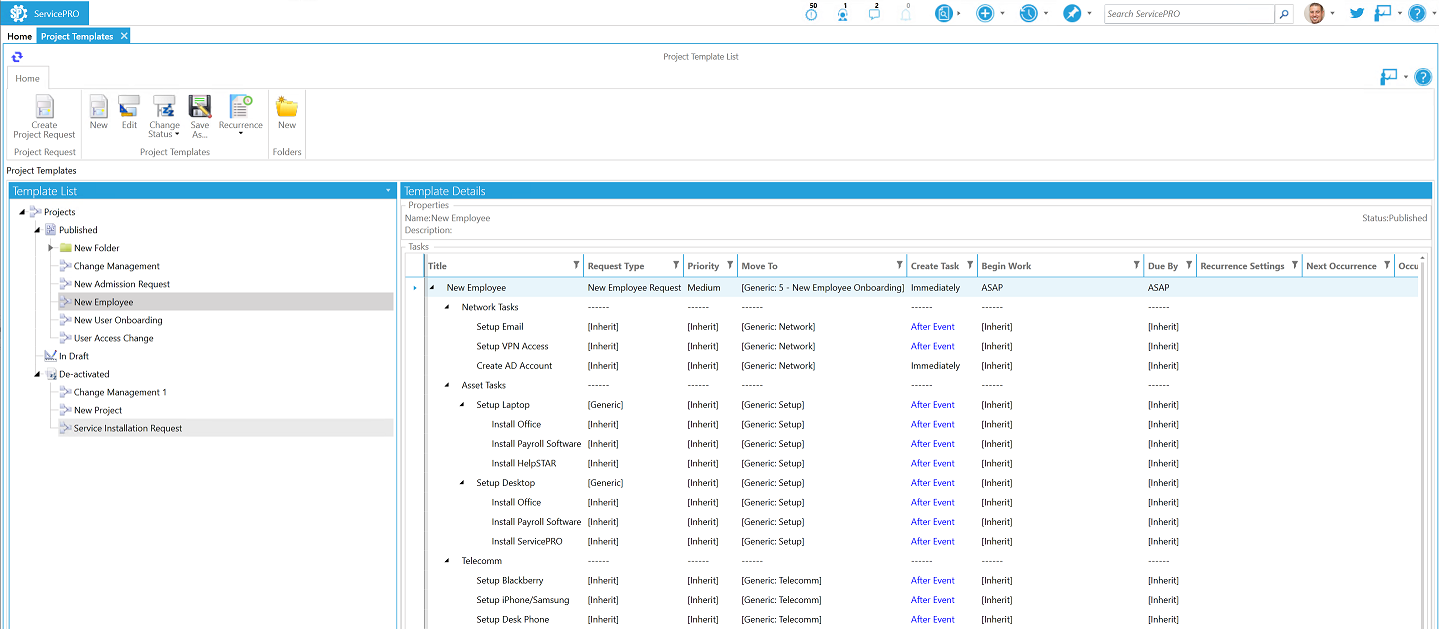
Project Templates
Return to Service Design
- 1. Overview
- 2. Navigation
- 3. Usage
- 4. Template Designer—Notification Tab
- 5. Manage Existing Project Templates
- 6. Ad Hoc Projects: How to Add a New Child Request to a Service Request
- 7. Folders for Project Requests
- 8. Ad Hoc Projects: How to Merge Requests
- 9. How to Rearrange the Current Project
- 10. How to Split a Request from a Project
- 11. Changes in Project Template Creation for End Users
- 12. Duplicating or Creating New Templates from Existing Project Templates
- 13. Add custom field information to title
Overview
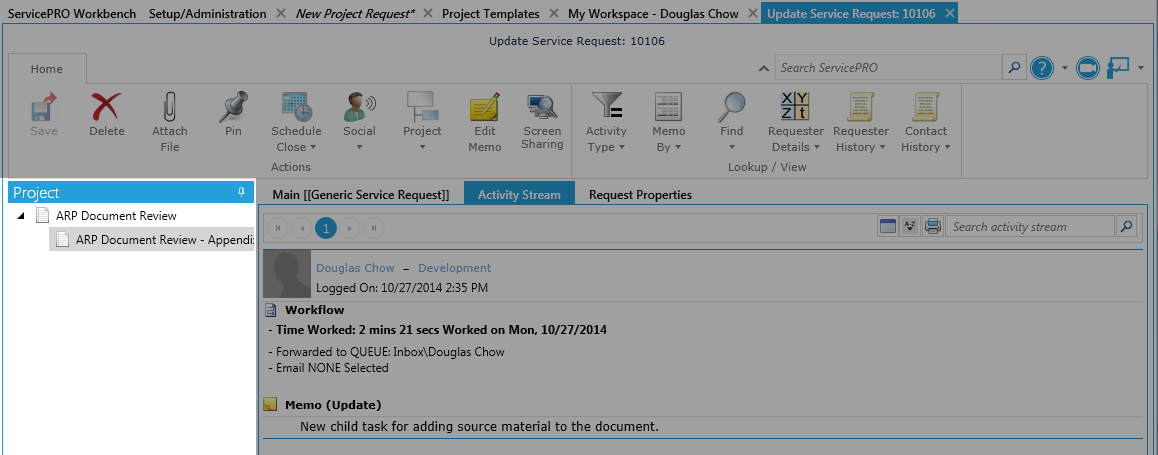
In a service desk environment, there are many scenarios where several tasks are related to the completion of others. ServicePRO offers the ability to link these tasks together in a parent-child relationship in Project Request formats, created with the Project Template Designer.Navigation
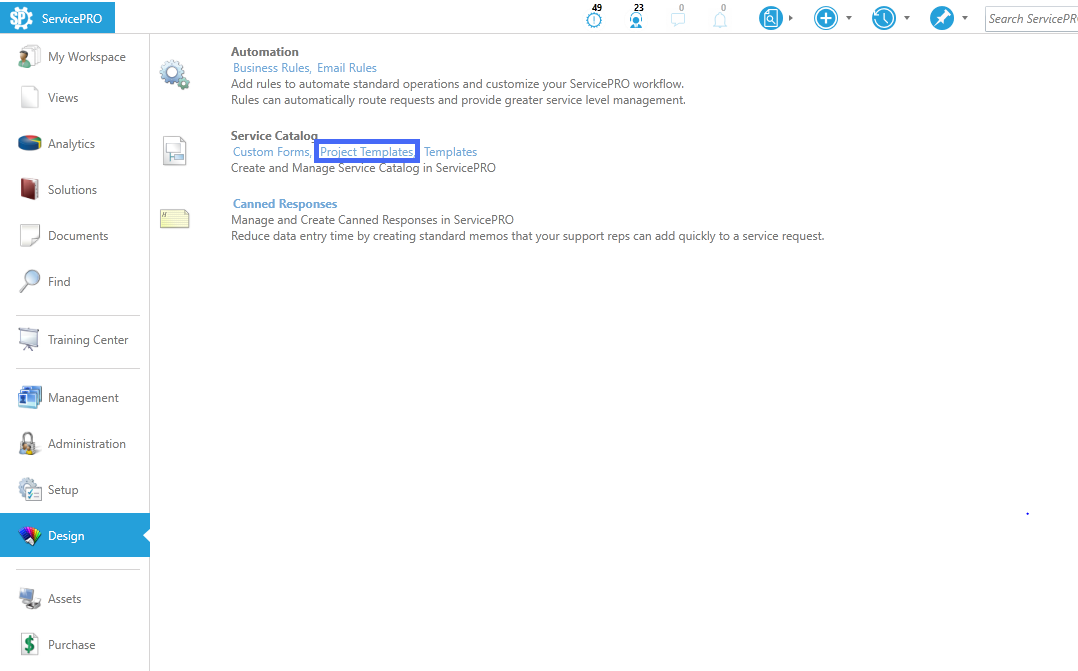
- Navigate to the backstage menu by clicking on the ServicePRO icon.
- From the Design tab, click on the Project Templates option as highlighted below.
Usage
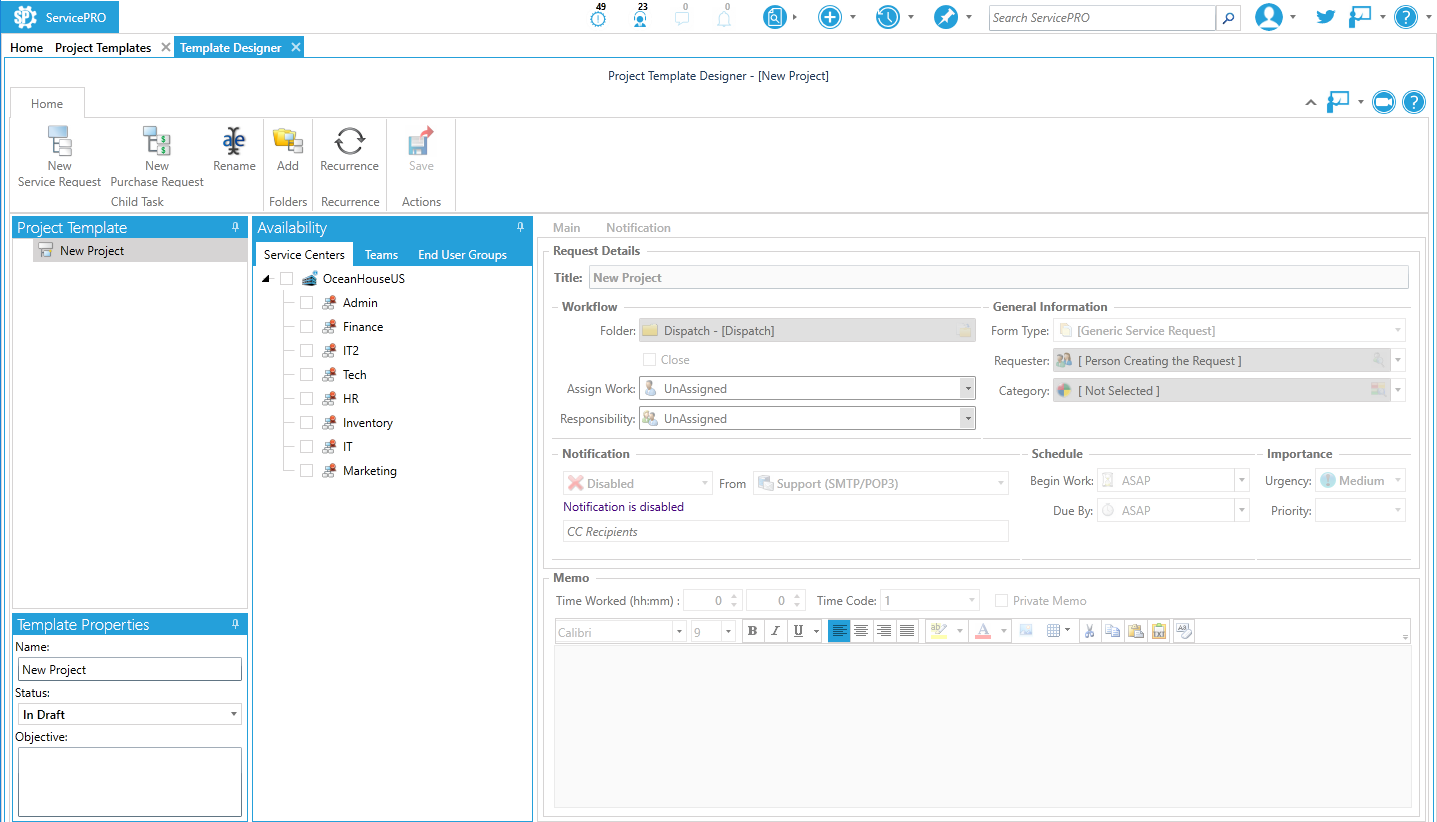
The ServicePRO Project Template Designer creates a group of service requests and purchase requests to manage multi-task activities associated with a single process. Project templates ensure that tasks are automatically generated, prioritized and routed to the relevant queue or Support Rep. For example, tasks associated with Onboarding a New Employee such as setting up desk, smartphone, laptop, AD account, Email etc., can be set up as child requests in a project.From the Ribbon Toolbar, click on the New Project Templates icon. The Template Designer window shown below opens.
All subsequent tasks to be completed within this project will have their own requests known as child requests. Child requests inherit their properties from the parent unless otherwise specified during creation.
Creating the Parent Request
Template Properties
- In the Name field, enter a name for the project.
- Enter the Objective for the project.
- The Status dropdown determines if the project template will be available to Support Reps and End Users. Select Published to make the project available for selection from the New Request Ribbon menu in ServicePRO and the self-service portal (If made available to end users).
Availability
- Select the Service Centers, Teams and End User Groups associated with this Project Template.
Only Support Reps belonging to these teams or those with privileges in the selected service Centers will be able to initiate this project. For example: - If the "Human Resources" Service Center is selected from the Service Centers tab, Users with at least one privilege assigned to any folder in the Human Resources Service Center may initiate the project.
- Like wise from the Teams tab, if the "Managers" Team is selected, any user belonging to the Managers Team may initiate the project.
- From the ‘End User Groups’ tab you can select the system defined team called ‘System Defined All End User Group’ to give access to all end users. You can also select specific end user teams that are listed here to give access to those individuals only. All end users will have access to the project template from the Self-Service Portal. Note:
In the Professional edition, Service Centers tab and Teams tab for setting project templates availability are not there. Only the “End User Groups” tab is available. This means that the project templates created in Professional edition are available to all the privileged users in the System.
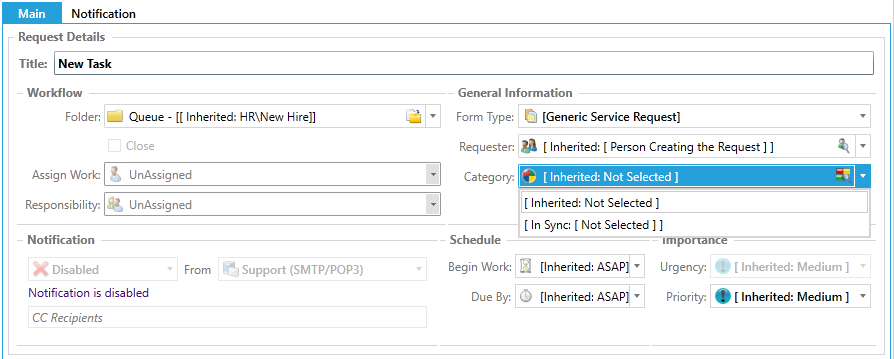
Request Properties
- Under Request Details – Most request properties can be pre-populated in the Workflow, General Information, Importance and Schedule sections. The properties that can be templated are:
• Request Title (Mandatory) - Every project parent is required to have a standard templated title
• Queue Folder (Mandatory) - Every project parent should have a location pre-set; either a queue folder or dispatch
• Assign Work (Optional) - Based on the location of the request it can be assigned to a support rep or a team
• Responsibility(Optional) - Based on the location of the request, responsibility can be assigned to a support rep
• Form Type (Optional) - A custom form can be associated to the parent request
• Category (Optional) - A category can be selected for reporting purposes
• Begin Work - Defaults to ASAP, but can be changed to one of the other wait states (WFR, Scheduled, Suspended)
• Priority - Defaults to Medium, but can be updated. - If applicable, in the Memo field, a standard memo can be entered that will be part of the template.
Adding a Child Request to the Project Template
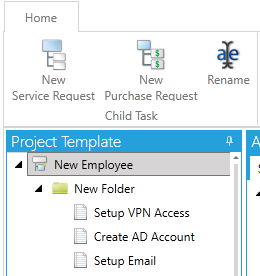
Child requests can be grouped into folders for easier viewing and organization of tasks and best utilized when creating a complex project. However this is completely optional.
- From the Ribbon Toolbar in the Template Designer, go to the Folders group and click on Add to add a folder. Enter a name for the folder.
- Click on a folder or an existing request in the Project Tree under which the Child Request is to be added.
- From the Child Task group in the Ribbon Toolbar, click on the New Service Request icon. A Service Request template is opened and the Child Request appears in the Project Tree.
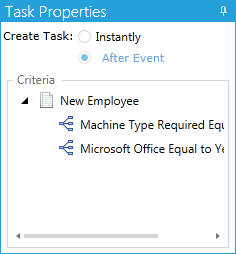
- In the Task Properties work area, click on the Instantly radio button if you want the child request to be created immediately when the project is launched; otherwise, click the After Event radio button. An after Event is used when you want to create a child request based on certain conditions and only if all the conditions are met, the child request will get created.
- Enter a title for the task. By default this will be the Request Title for the request.
- By default, the child request inherits its properties from the parent. Applicable fields can be changed to a new value to suit requirements. Inherit vs. In Sync is discussed in detail below.
- Continue adding folders and child requests until the project is complete.

Adding a Purchase Request Task
It may be necessary to include a Purchase Request in a Project Template. To do so:- Highlight the folder or request to which you want to add the purchase request.
 Highlighted Project Request folder.
 - In the Child Task group, click on the New Purchase Request icon. A Purchase Request form opens and the Request appears in the Project Tree.
- The form is mostly similar to the standard New Service Requests window. However, there is an additional option to add Items in the right corner above the memo field. Select the Items icon to open the alternate Purchasing menu.
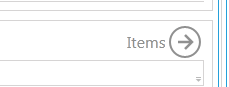 Items icon above the Memo field.
 - Memo – The Memo area switches to a Line Items grid, where you can add Products for purchase. The columns in the grid are, as follows:
• Product – Select a Product to add to the list.
• Vendor – Select a Vendor for the Product.
• Qty – Enter quantity of product to be purchased.
• Urgency—State urgency of the order.
• Memo – Write a text memo to describe the Product.
• Allocation—Indicate the recipient of the items being purchased.
 The Items Line Items grid.
Child Requests: Inherited and In Sync
When Creating or Editing a Project Template, and adding a Child Request, fields such as Requester, Category, Folder, Form Type and others can be set as either Inherited or In Sync with the parent request’s fields.• Inherited – One time Inherit of the parent request’s field values; the field values in the parent request can be thereafter changed independently from the child request. If Inherit option was selected for Form Type, all custom field values are also inherited by the child request from the parent.
• In Sync – Keeps the child request’s field values in sync with the parent request's field values. This means whenever the user updates the value for a specific custom field in the Parent request, it automatically updates the respective custom field value in the child request as well.
Create After Event
When the After Event radio button is selected in the Task Properties work area, a CAE Condition(s) window will open. This will allow you to specify event conditions for the creation of a child request, which will be created only after a specified event occurs.
- When adding or updating a child task, click on the After Event hyperlink in the Request Properties work area.
 Create Task After Window.
 - The CAE Condition(s) window shown below opens.
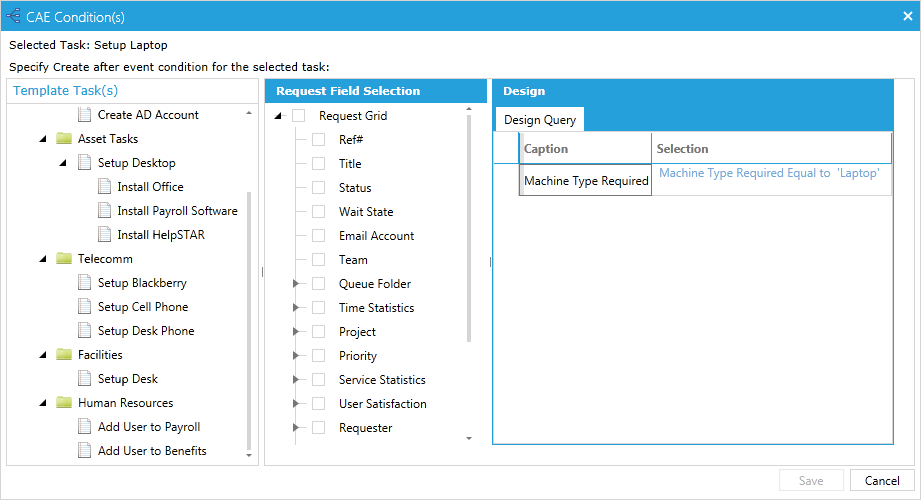 Create Task After Window.
 - The Template Task(s) pane lists all the requests in the project.
- The Request Field Selection pane has the ServicePRO fields where we can set conditions for creation of the child request.
For instance, in our “New Employee” example, we have created a child task template called “Setup Laptop”. The parent request has a field in the custom form called ‘Machine Type Required’ which has the options "Laptop" or "Desktop". In order for the Setup Laptop task to be initiated, the user submitting the request should select "Laptop" for the Machine Type Required field in the parent request.
To set this condition, we need to first select the request that the condition is based on from the Template Task(s) pane. In this case the parent request has the Machine Type Required custom field that is completed by the user. From Request Field Selection we navigate to the custom field called Machine Type Required and set the criteria equal to 'Laptop'. This will ensure that the Setup Laptop task will only get initiated if the parent request has the option "Laptop" selected in it.

These are just a few examples of how after events can be set based off of properties of the parent or other child requests.
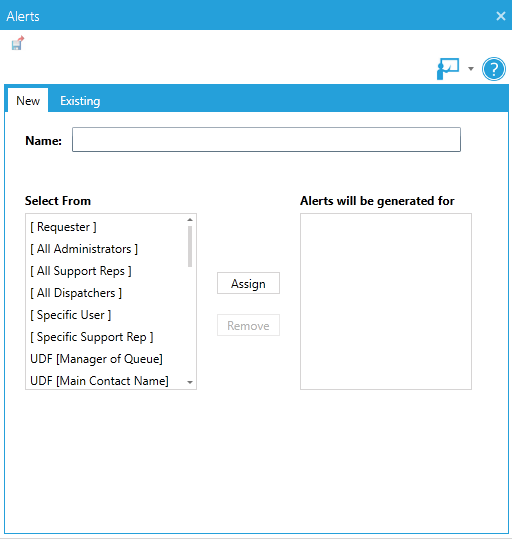
Template Designer—Notification Tab
Each request within the project template has a Notification tab, which can be used to generate alerts or send text messages, email, and/or reminders. Notifications are only sent at the time of creation of the request in the project.
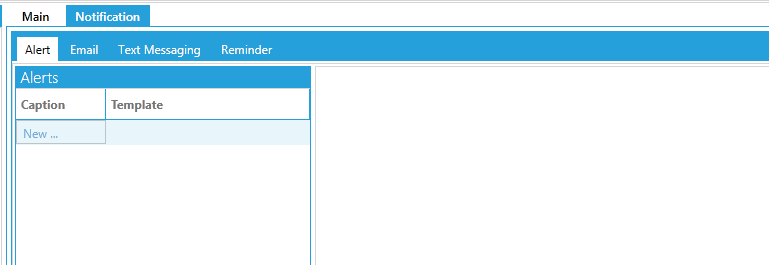
When you configure a notification, it will be saved as a template for other projects or business rules. If templates have been previously created, they can be selected from the Existing tab in the window.
Alerts
- Enter a Name for the alert template.
- To select the alert recipients, highlight an item and click on the Assign button, or double-click on an item in the Select from field, which will move that item to the Alerts will be generated for field.
- Click on the Save icon in the Toolbar to save changes.
 Alert
Alert
Email and Text Messaging
- Enter a Name for the text message or email template.
- Select the To and CC recipients using one of these two methods:
• Click on the To or CC button to select specific users.
• Click in the To or CC field to set the cursor in the target field then double-click on a To/CC Variable. Using variables helps send email or text messages to all administrators, all Dispatchers, or other ServicePRO users. - Enter a Subject for the message.
- Click on the Add Trace Memo checkbox to have the system log a memo in the request indicating that a text or email message was sent.
- Enter the message in the Body text field. Double-click variables to use them in the message.
 Email Template
Reminder
Configuring a reminder is very similar to configuring text and email messages except that no CC and Subject lines are used, and you must use the Schedule Type field to set a specific interval or time. From the Schedule Type drop-down, you can set:- Interval (for example, 0 days, 2 hours, 0 minutes),
- Interval and Time (for example, 2 days after run date at 9:30 AM)
- Date and Time (for example, 06/30/2004 at 9:30 AM).
Recurrence
If this project needs to be launched on a scheduled interval, select the Recurrence option to schedule the automatic creation of this project. The Schedule Task window will appear as shown below:
- Select the occurrence of the project by selecting the daily, weekly or monthly radio button.
- Set the frequency of this project to occur once at a specified time or at a timed interval.
- Specify a date range for which this project should be launched.
- If these settings have been previously configured and need to be removed, click on the Remove button to delete the recurrence configuration.
Manage Existing Project Templates
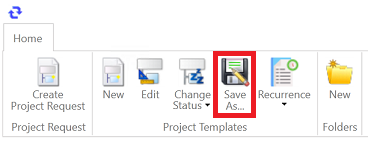
Follow these instructions to update and manage existing project templates to keep them current.- Select a Template from the Template List in the left pane.
Updating Projects.
- Use the toolbar icons to perform the following tasks:
- Create Project Request - Create a project request from the selected template.
- New - Create a new project template.
- Edit - Edit the highlighted project template.
- Change Status - Change the status of a project template – Published, In Draft, or Deactivate.
- Save As - Save a copy of the currently selected project template. This creates a duplicate that can then be edited to create a new template with similar properties.
- Recurrence - shows you either all or just recurring projects only. By default, "All" is selected. When the user selects the option "Recurring Projects Only", only the Project Templates that have recurrence set on them will be filtered and displayed. This Project Template view has three recurrence specific columns added: "Recurrence settings", "Next Occurrence" and "Occurrences" which display the details on the recurrence if set.
- New (Folder) - Create a new folder in the Template List.
Ad Hoc Projects: How to Add a New Child Request to a Service Request
To add a Child Request to an existing Service Request:- Select a Service Request and click on the Project icon of the service request.
- Select New Child Request from the drop-down.
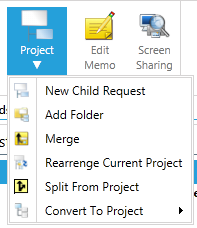 Project Tab Options
 - A child request will be launched in update mode. The child request will inherit all properties from the parent request, however these can be edited as per requirement. Click on the Save icon to create the request. A prompt will appear confirming the request has been logged.
- When viewing this request, a project structure will appear in the left Project pane as shown below:
 Parent-Child Service Requests added.
Folders for Project Requests
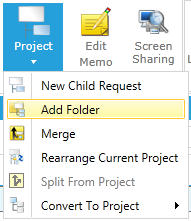
Folders can be added to Projects to organize Child Tasks into groups. Follow these steps to add a folder to a Service Request:- Select a Service Request from a listing and click on the *8Project icon from the Ribbon Toolbar.
- Select Add Folder from the drop-down.
 Add a Folder from the Ribbon Toolbar’s Project dropdown.
 - A name entry form will appear, prompting you to type the Folder’s name. Type the name and hit OK.
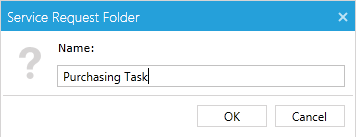 Service Request Folder name entry
 - The new Folder will be visually displayed in the Project pane, indicating you have added it.
- When a Folder is selected, you can add New Child Requests or Folders to it.
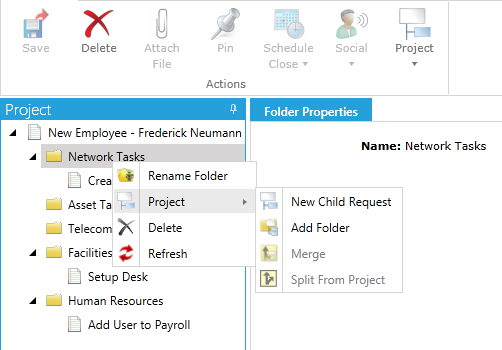 Options that can be added to Project Request Folders.
Ad Hoc Projects: How to Merge Requests
At some point, you might discover that two existing requests are related. For example, an incident could have been reported that had been caused by another problem.In ServicePRO, you can merge a child request to a parent request at any time by completing the following process:
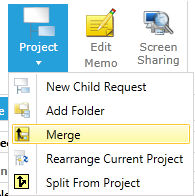
- Click on the Project icon on a request. This request will be the parent request.
- Select Merge from the Project drop-down.
 Merging Two Requests/Projects.
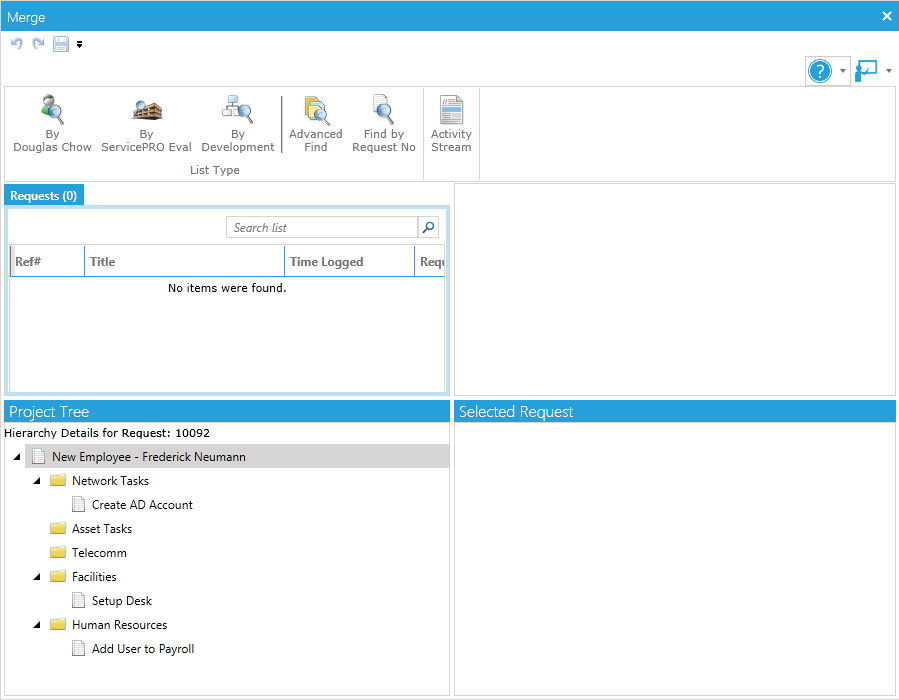
 - The Merge window prompt will appear. This window allows you to filter requests by the following options in order to search for the request that needs to be merged with the parent request:
• Requester – All requests logged by the requester of the parent request.
• Requester Company – All requests logged by the users in the same Company as the requester of the parent request.
• Requester Organizational Unit - All requests logged by the users in the same Organizational Unit as the requester of the parent request.
• Advanced Find – If none of the above options apply, then you can perform an Advanced search to look for the request.
• Request Number – If you know the request number of the request that needs to be merged you can directly search for it.
 Find Request Filter.
 - When you have selected the desired filter, specify a Date Range to further refine results:
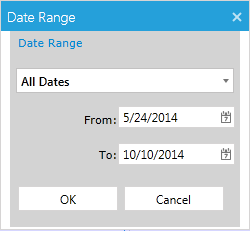 Date Range Filter
 - A list of requests will appear by the search filter selected. Highlight the request to be merged and it will appear in the ‘Selected Request’ window.
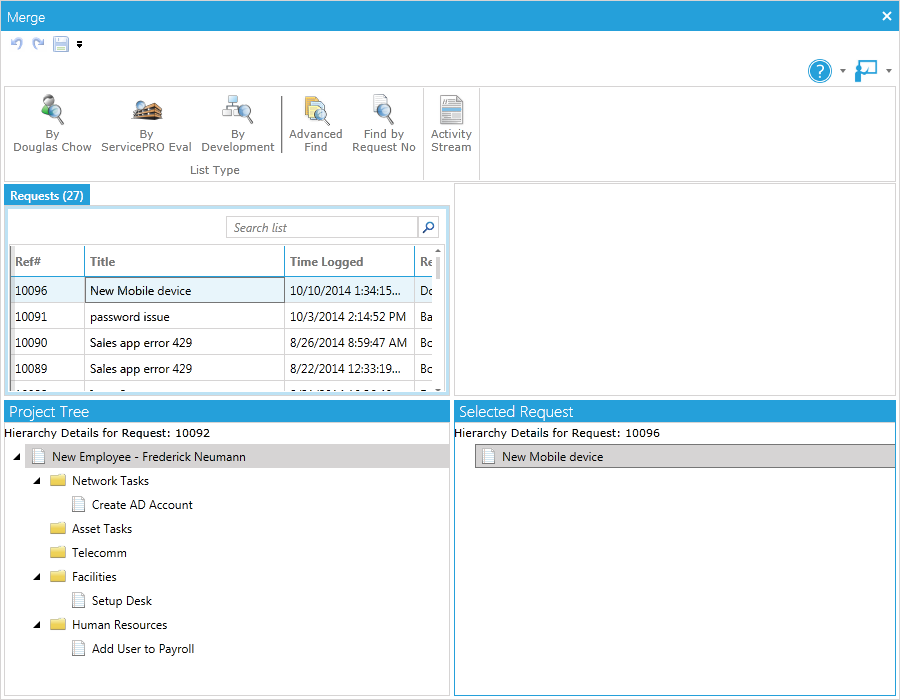 Filtered Requests to Merge
 - Notice the Hierarchy Details for Request panes. The parent request will appear in the left pane.
To merge a request, select and drag the child request to the parent request.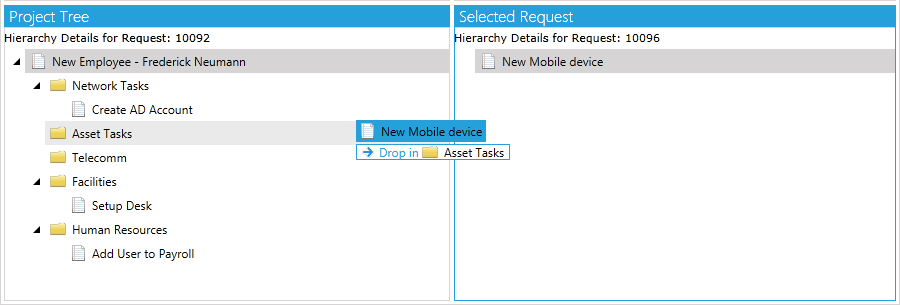 Merge Request Window – Dragging and dropping requests.
 - When the request appears as a child request of the parent request, click on the Save icon to save the parent-child relationship.
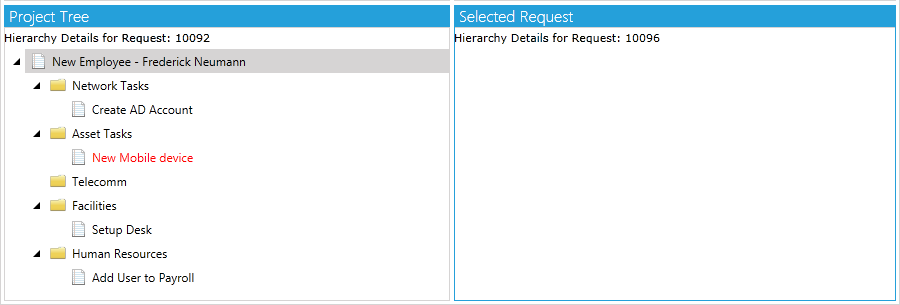 Merged Requests
 - When the request has been merged, the project hierarchy will be displayed in the project tab in the Request window.
How to Rearrange the Current Project
Tasks in a Project Request can be rearranged. This is useful for moving Child Tasks between different folders.- Select a Service Request and click on the Project icon of the service request.
- Select Rearrange Current Project from the drop-down.
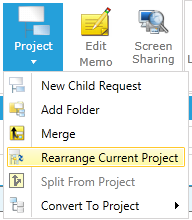 Rearrange Current Project option.
 - The Rearrange Project window opens.
- Select the request you wish to move, and drag it into the folder you want, as shown below.
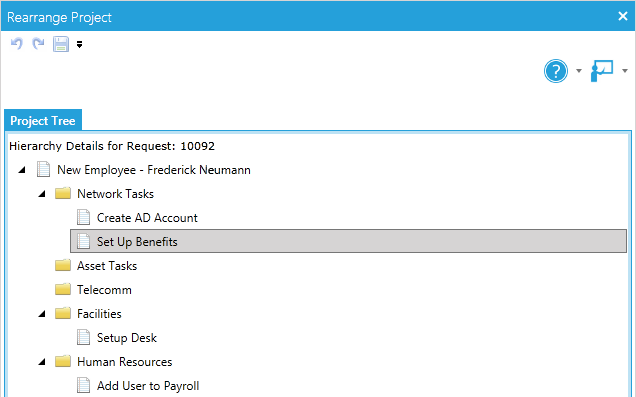 Rearrange Project window.
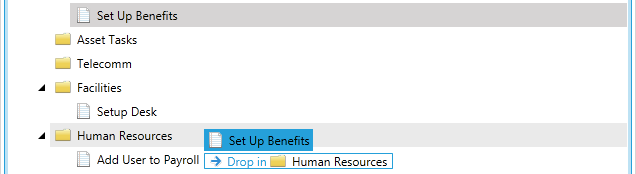 Dragging and Dropping “Set Up Benefits” Request to Human Resources folder.
 Red font color reflects the Rearranged Child Task.
 - A request that has been moved will be displayed in red font.
- Select the Save icon to save your changes.
How to Split a Request from a Project
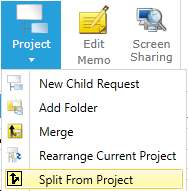
A request can be removed from a project at any point. To do so, perform the following:- From the Project pane, highlight a child request in the tree structure to select it.
- From the Project icon in the ribbon, select Split From Project.
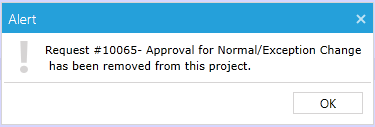
 Click on Split From Project icon to remove the request.
 - A message appears that the request has been disassociated from the project.
 Request Removed from Project MessageNOTE: A parent request cannot be closed unless all child requests have been closed. To re-open a child request, the parent request must also be opened.
Changes in Project Template Creation for End Users
While creating or editing Project Templates, if the child task’s Request Type and Folder combination differs from the Parent Task’s, the category options ‘Inherit’ or ‘In Sync’ will not be available in the Child Task. This is done to avoid mismatches between types, folders and categories for Child Tasks in Project Requests.
For example, the following changes will occur when the root Project Request category is set to [Not Selected]:
- In both Create and Edit template modes:
- ServicePRO will not allow Child Request tasks to inherit the [Not Selected] Category if the current task’s Folder and Request Type do not match the Parent Request task’s Folder and Request Type.
- Whenever a Folder or Request Type of a Child Request task with a category set to either [Inherited], [InSync], or [Not Selected] is changed, and is now different from parent task, [Inherit] and [InSync] options will be removed from the Category dropdown list, and the Category will automatically be set to [Not Selected].
- In Edit template mode only:
- When a task in the Project Tree is selected, if the newly selected task is assigned [Inherited], [InSync] or [Not Selected] categories, but the Folder and Request Type settings do not match the parent request’s settings, then categories will automatically be changed to [Not Selected], and [Inherited] and [InSync] options will be removed from the category dropdown.
- When saving an existing template, another check will be performed to find out if there are any [Inherited], [InSync] or [Not Selected] category selections in Child Tasks where Folder and Request type do not match with the Parent’s. Users will be informed with a message stating “The following task categories cannot be Inherited/InSync from parent because of mismatch with parent Folder and Request type”.
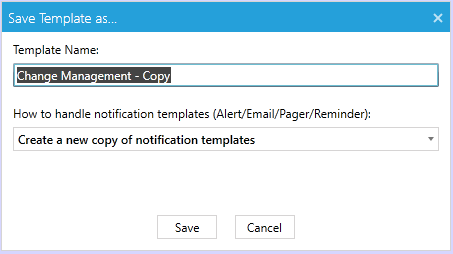
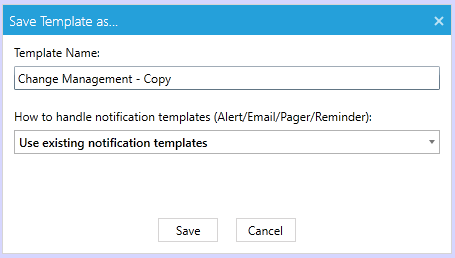
Duplicating or Creating New Templates from Existing Project Templates
Option 1: Create a new copy of notification templates.
Option 2: Use existing notification templates.
Add custom field information to title
As of version 14.2.16, a new feature has been implemented which will automatically populate the project or quick template title with custom field information from the same request. Below are the steps for configuring this feature:- Determine the Field Names of the custom fields that are to be displayed in the Request Title.
The Field Name for a selected field can be found in the Name property in the Properties window of the Form Designer.
- Format the Quick Template/Project template titles manually using the Custom field variables enclosed in double curly braces in the format of {{Field Name}}.
Example:
{{Patient Name}} - Move from {{Location}} to {{Destination}}
In this example, ‘Patient Name’, ‘Location’ & ‘Destination’ are all Field Names. Entering tab names or form names is not required.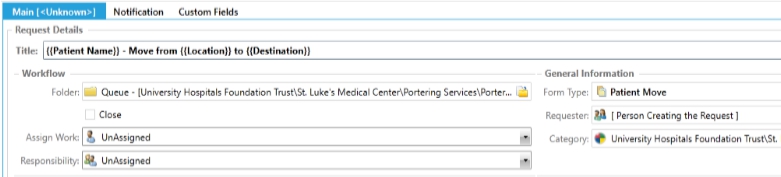 Note: All custom field variables are case insensitive but will check for whitespace.
- Whenever a New Project/Quick Request is created using the template the Title will get populated with the selected custom field information after the request is saved.
Note: If a custom field was left blank during initial request submission, then the Title will omit that specific field information. It is recommended to make these custom fields ‘Required’ at the form level.
Note: If the custom field is updated or changed at a later time, the title will not be synchronized with the updated custom field value.
Example:
{{field name}} is the same as {{Field Name}}
{{ Field Name }} is not the same as {{Field Name}}
Note: The Project Designer privilege is required to create Project/Quick Request Templates.
Warnings:
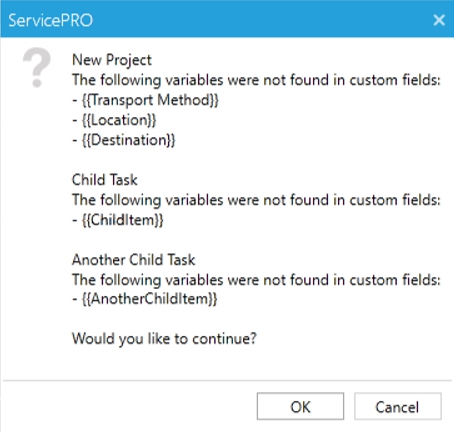
If you add a Field Name to the title that does not exist within the custom form associated with the Quick Template/Project template then a warning message will indicate as such when you try to save the template. You may choose to ignore this message and it will simply take the values as is and insert it into the title.
The warning message you may receive will be formatted in the following way:
- Project Title or Child Service Request Title
- The literal text: "The following variables were not found in custom fields:"
- The list of variables that it cannot map to custom field names within the project title or child service request title.
See below for reference on how this looks in a real world scenario.
Limitations:
Using function type custom fields to populate the title is currently not supported.