Business Rules - Service Requests
Business Rule Examples
Return to Service Automation
Business Rules can be used to automate standard operations and customize workflow. Business Rules actively monitor the system to identify all requests that meet a certain pre-defined criteria, after which they execute a workflow change in the request and/or send out automated notifications from it.
Navigation
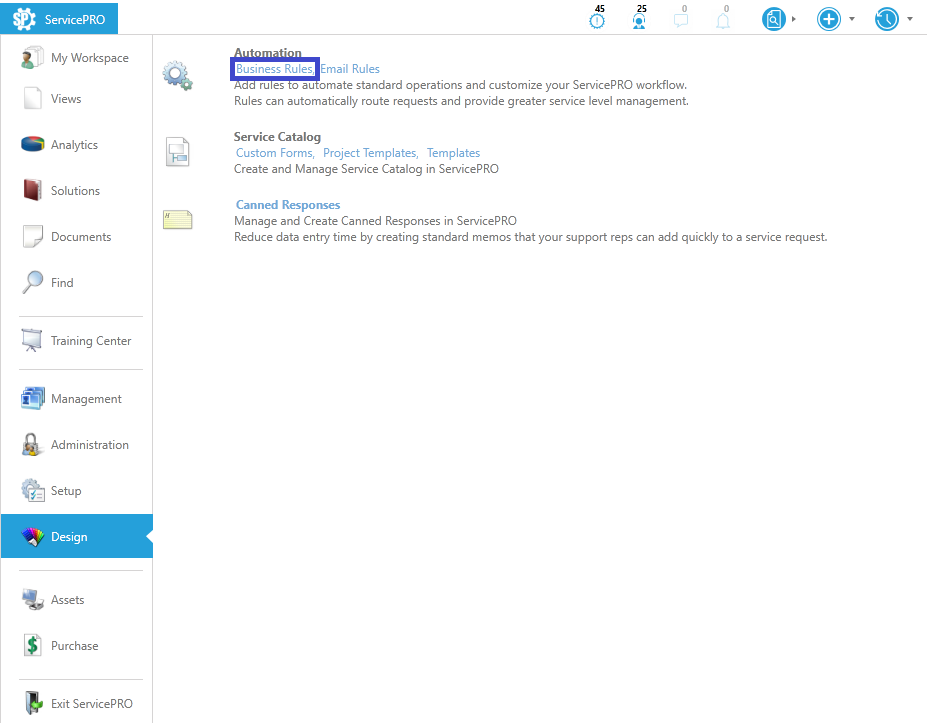
- Navigate to the backstage menu by clicking on the ServicePRO icon.
- From the Design tab, click on the Business Rules option as highlighted below.
 Business Rule for Requests Navigation
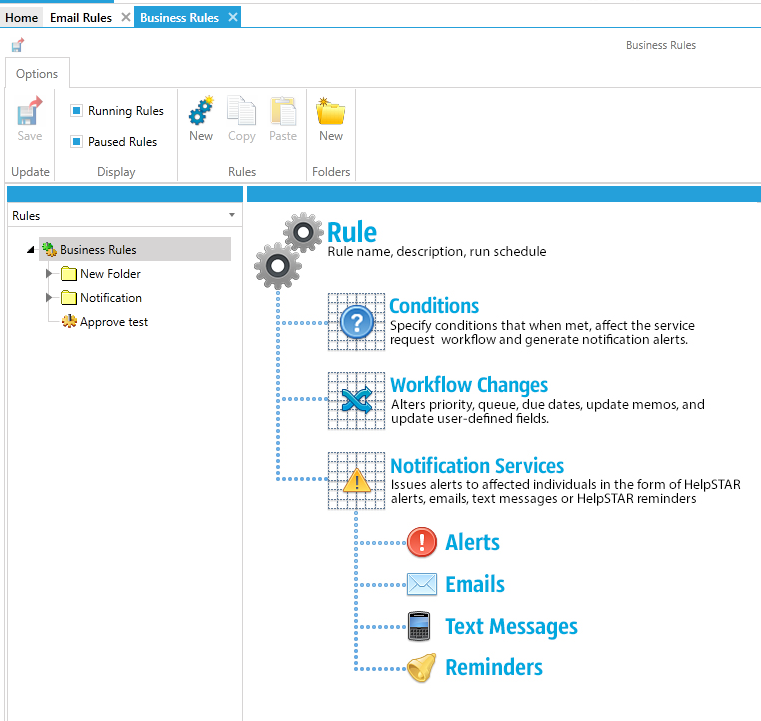
The Service Request Business Rule designer appears as shown below.
Updating an Existing Rule – Toolbar Overview
When an existing rule is highlighted, the Toolbar displays an Options tab as shown below.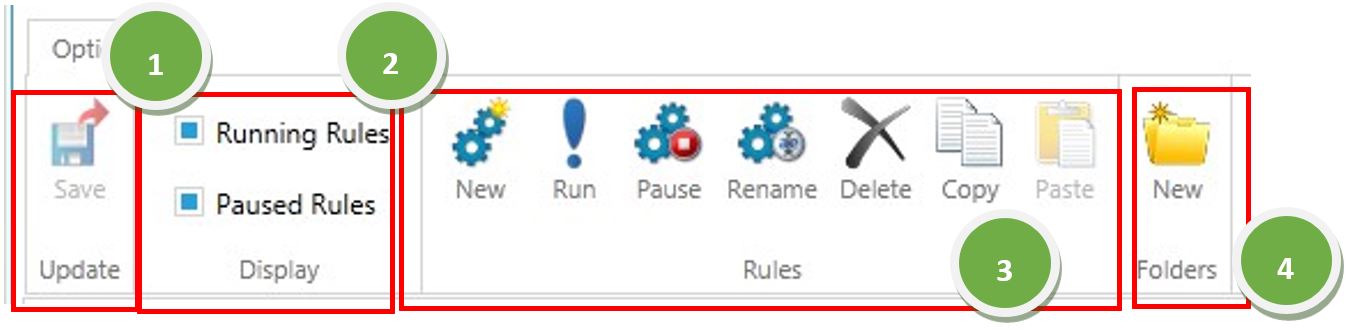
The Options toolbar includes four task groups:
- Update Task Group
• Save – Save or cancel changes that have been made. - Display Task Group
• Running Rules – Display Rules which are currently active.
• Paused Rules – Display Rules which are currently not active. - Rules Task Group
• New – Create a new business rule.
• Run – Manually run the rule that is selected in the ServicePRO Rules tree view.
• Pause – Pause the rule that is selected in the ServicePRO Rules tree view.
• Rename – Change the name of the selected rule in the ServicePRO Rules tree view.
• Delete – Permanently delete the rule that is selected in the ServicePRO Rules tree view.
• Copy – Copy the selected rule.
• Paste – Paste copied rule in the selected location - Folders Task Group
• New – Add a new folder to help organize your business rules.
Creating a New Request Business Rule
In order to create a new rule, first determine the following factors:- The workflow to be achieved and the specific criteria the rule should look for.
- The type of notifications to be sent by the business rule.
- When and how often the business rule is to run.
Let’s create a business rule for the following scenario:
Elizabeth Hawthorne, a Human Resources Manager at Oceanhouse, Inc., wants her staff and herself to be informed when a request is forwarded to specific queues that they have been assigned to. She also wants all such requests to be updated with Priority ‘High’.
She has decided a business rule would best address this scenario.
General Tab
To create a business rule for this scenario, perform the following:- From the Design tab click on Business Rules under the Automation heading.
- In the Options tab, click on the New icon , The Business Rule designer appears as shown below:
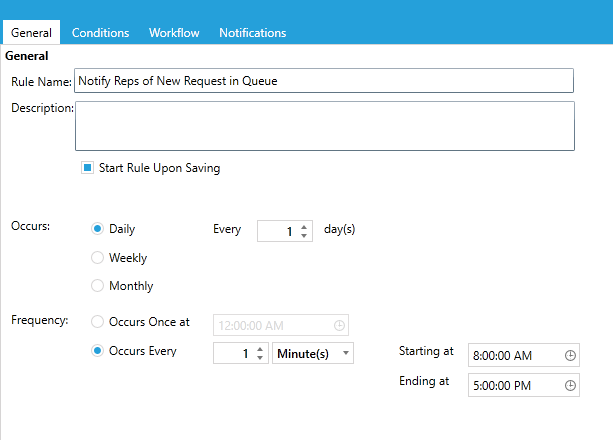
- In the General Tab, General area, enter a relevant name in the Rule Name field.
- In the Description field, define the rule’s purpose.
- By default, a rule will run automatically upon creation. If you prefer that the rule not run upon creation, uncheck the Start Rule Upon Saving checkbox before saving the rule.
- In the Schedule work area, select how often the rule should run. The smallest increment that can be selected is 1 minute. You can also select the start and end time for the rule to run in a day based on your business hours.
- When you complete these steps, click on the Conditions tab.
Conditions Tab
In the Conditions tab, specify the requirements that a request must meet to run a business rule.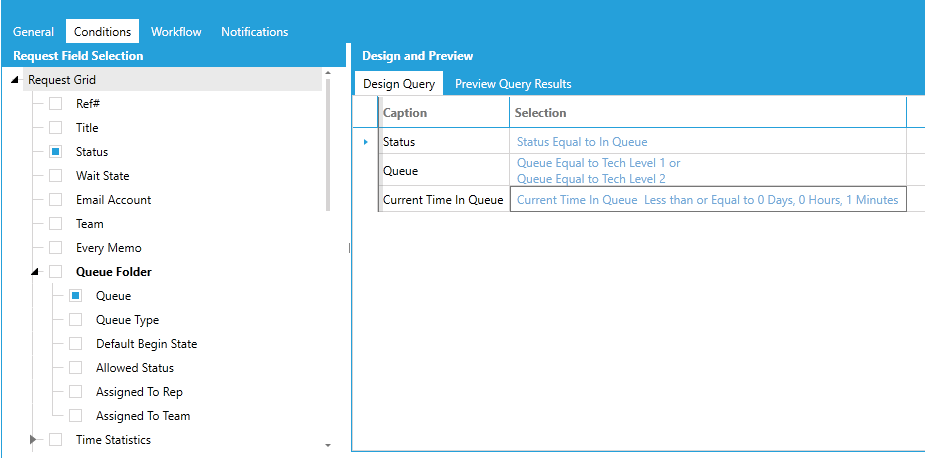
1. Request Field Selection
- Select fields needed to define the criteria for a business rule to run on.
2. Design and Preview
- Displays the database fields selected in the Request Field Selection work area. Here you can define the conditions by clicking on ‘Criteria…’ in the Selection column next to each Field caption. For e.g., in our scenario the rule is looking only for requests that have a status of ‘In Queue’. We would select the field ‘Status’ from Request Field Selection area and in the Design Query area we would set the criteria ‘Status equal to In Queue’
You can go to the Preview Query Result tab to view which requests meet the conditions of your business rule. This provides confirmation that the business rule is set up correctly. If the result is not as expected, the business rule may require changes.
Workflow Tab
Request updates and routing options are selected in the Workflow tab. All requests that meet the conditions that were set in the Conditions tab will have this workflow applied when the rule is run.
So for our scenario, if a request is moved to the desired queue, and business rules are running, that request will be updated based on the parameter values defined here. For example, if Priority is set to “High” in this tab, all request's priority will be set to "High".
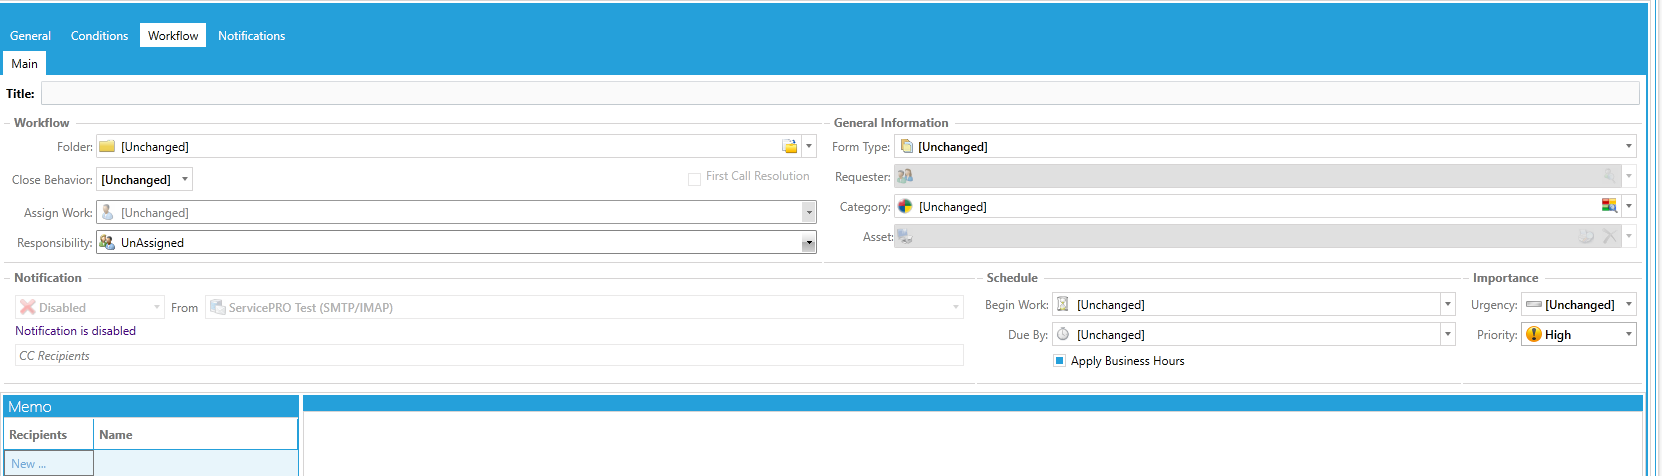
The Workflow tab has five updatable task/information work areas that mirror a request. Enter any updates to be made to all requests meeting the conditions of the Business Rule.
- Workflow
- General Information
- Importance
- Schedule
- Memo
In the scheduling area, you can see a checkbox labeled Apply Business Hours. ServicePRO allows you to take into account business hours when setting the scheduling for your business rules. So when you check this box, your scheduling will be set according to your business hours. So, for example, if you set the schedule using an interval of one business day, and the rule initiates on a Friday, and you do not work weekends, the rule will not take effect until the following Monday.
For our example, in the Workflow tab of the business rule, we set Priority to “High”.”
Notifications Tab
You can create multiple notifications per business rule.
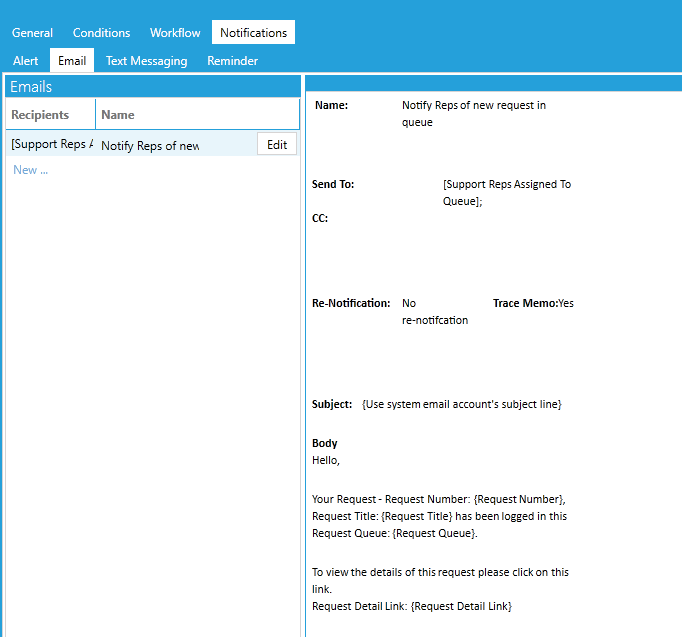
There are four types of notifications from which to choose:
- Alert – Send an alert to notify appropriate personnel for the request affected when this business rule runs.
- Email – Send an email to a user or multiple users for the request affected when this business rule runs.
- Text Messaging – Send text message to email address configured in User Options.
- Reminder – Schedule an automatic reminder for yourself, or other Support Reps.
Using an Existing Template for Email Notifications
- Start a new Notification by going to Notification tab, then Email, then New.
- Select the Existing tab.
- If you want to select the existing template for the current business rule, then double click or else select copy to create a new duplicate template. This template can now be further modified as per your requirement.
Email Tab
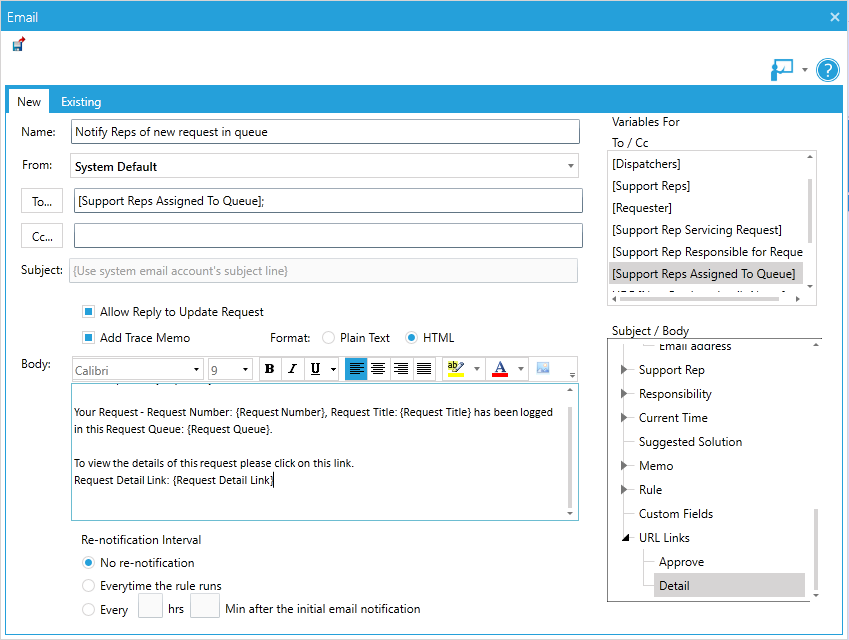
Using this tab, you can configure a new email notification.
- Name – Enter a relevant Email Template Name.
- From – Select the System Email Account this notification should come from.
- To – Click on the To button and select the recipient for the email notification. You can also select from a list of pre-selected options in the 'Variables For To/Cc' work area. This feature helps you select a group of people who will receive notifications without having to individually select each person. For example, you can send the email to “All Dispatchers.” In this section you will also find all User Lookup custom fields that have been placed in various form types.
- CC – Click on the CC button to select recipients who should receive a “carbon copy” of the notification. Again, you can also select from a list of pre-selected options in the Variables For work area.
- Subject – Enter a subject for the email notification. You can also enter variables in your Subject field using the Subject/Body section in the 'Variables For Subject/Body' work area. For example, if you want the request number to show in the subject, you would select the “Request number” variable.
NOTE: Customized subject line option is unavailable if ‘Allow Reply to Update Request’ is enabled. ServicePRO will create a standard subject line which includes the Request Title and Number in order to recognize the request that needs to be updated with reply from sender.
- Trace Memo – Log a memo in the request when notification is sent.
- Allow Reply to Update Request– Select this option if you would like the requester or support rep of this request to be able to update the request by replying to this email
- Format – Select whether you would like the email to be sent in plain or rich text format
- Body – Enter the email body for this notification. Variables can also be selected in the body that will be automatically populated to referencing a specific request.
- Re-notification/Interval – In this work area you define how often a notification will be sent to the user(s). Possible intervals include:
- No re-notification – Click on this radio button when only one notification is required for the user(s).
- Every time the rules run – Click on this radio button to send a notification upon each scheduled run of the email rule.
- Every – Click on this radio button to specify the exact interval after the first notification in which the notification should be re-sent by entering values in the adjacent Hrs and Min after… fields.
When you have completed entering in the new email template information, click on the OK button. This email template will be added to the Email Notification list.
Updates to Date/Time variables in Email Notifications
As of ServicePRO version 14.2.18.x or higher, Business Rule Email notifications have been enhanced to show the time zone abbreviation beside the date-time values in the email body whenever date/time fields are included in the notification. In order to have the date/time values displayed in a specific time zone in the rule email notifications, the client should set the "ClientHomeTimezone" configuration key with their specific home time zone name [eg: Eastern Standard Time, Pacific Standard Time etc.,] in the Configuration file for the StarWatch Service (StarWatchService.exe.config on the app server under the default location C:\HelpSTAR\HLPSTRCS\Modules\StarWatch).<add key="ClientHomeTimezone" value=""/>
For example, if the value is set to "Eastern Standard Time" a time variable such as "Time Logged" will now appear as:
Current Time: November 18, 2020 9:36:25 AM (EST)
If this key is not set with a value, then the rule notifications will have the date/time values specified in the server time zone, along with the server time zone abbreviation.